
The preview dialog
Style every stock state of a product or variation, with formatting buttons and a live desktop or mobile preview.
Note
This is part of Stockline Pro.
The eye button next to a product's (or variation's) message fields opens the Stock message dialog. It's where you set everything Stockline Pro stores for that product: a message, icon and colour for each of the four stock states.
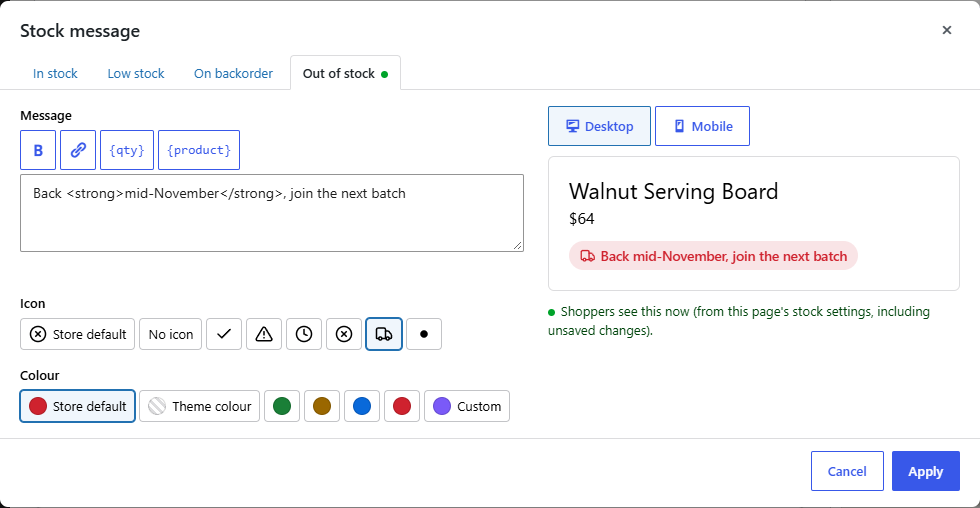
Tabs: one per state
The tabs along the top are In stock, Low stock, On backorder and Out of stock. The dialog opens on the state whose eye button you clicked. A green dot marks the state the product is in now.
For a variation, the title shows its number, for example "Stock message · Variation #482", so you know which one you're editing.
Message
Type the message for the selected state. When it's empty, the line below the box says what's used instead: the store's message (or, for a variation, the product's), shown in full, or WooCommerce's own text if there's none.
The buttons above the box insert formatting for you:
| Button | Inserts |
|---|---|
| B | Bold: wraps the selected text in <strong>…</strong> |
| Link | Asks for an address and turns the selected text into a link |
{qty} |
The units left |
{product} |
The product's (or variation's) name |
Icon and colour
The first choice in each row is the inherited one: Store default, or Product's for a variation, shown with the icon or colour it currently gives. Leave it selected to follow the store (or product) as it changes.
The other choices give this product its own:
- No icon, or one of the six icons.
- Theme colour to use your theme's text colour, one of the store's state colours, or Custom to pick any colour.
The preview
The right side shows the product's name and price with the stock line as shoppers would see it, in your store's style (plain or badge). Use Desktop and Mobile to see it at a narrow width too, where a long message wraps.
Below it, the dialog says whether this is what shoppers see this now, or what they'll see when the stock reaches this state. It works this out from the stock settings on the page, including changes you haven't saved yet: change the quantity on the Inventory tab, open the dialog again, and the marker follows.
Apply, then update the product
- Apply puts your changes into the product's fields and closes the dialog. The small previews under the fields update straight away.
- Cancel, the × button or the Escape key closes it without changing anything.
Like every other product field, nothing is saved until you click Update (or Save changes on the Variations tab).
Tip
To try out a message without touching the live product, open the dialog, experiment with the preview, and click Cancel.